This is the second lesson of the Art Studies class by Poochie Myers.
Poochie would like to start a dialogue with new students to art as well as professionals who might want to include segments into these art lessons or field questions from participants.
Please email your comments to Poochie: poochie@artistzone.org.
If you have to struggle then you are doing something wrong.
Lesson Two - Drawing
Contour, Gesture, Modeled Drawing, and Getting More Depth
- contour - a linear means of defining form.
- gesture - a linear or tonal
means of representing the model's action or pose.
- modeled drawing - a tonal means of indicating the form.
- getting more depth - having the effect of shades and lines create space.
Materials:
Pencils, chalk, chalk pastels, pressed and/or soft charcoal, oil
pastels, pencils, paint, ink, cow markers, ink markers, stick oils. Use
anything that makes a mark.
Blind Contour Drawing
Click on images for larger view and use your browser's back button to return
| As you draw you will only look at your subject, not at your paper.
Once you begin your drawing do not look at your drawing and do not lift
your pencil off the paper. Let your eye and hand become one. You will
draw every tiny contour of your subject. |
 |
If you come to an edge of something, keep your pencil on the paper and
draw on to the next edge. Just be like an ant crawling along the contour. Go slowly. This is a
training session for your hand.
|
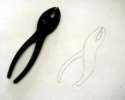
A good subject is a plant - don't get lost in the leaves. Just follow
the contour, the edge of the leaf. Perhaps down the leaf onto the pot and onto
the table. Tools are always interesting too.
Your
completed drawing will probably look like a jumble of lines at first but as you
practice this method you will begin drawing accurately.
Remember, practice, practice. As you are sitting at a cafe or waiting
for a bus - draw, draw.
Most artists
don't look at their paper but have practiced so much that they have trained
their eye hand coordination to the extent that their hand goes where their eye
does. They have trained their eyes to see and their hands to draw what they see.
Contour
drawing is slow. Take a long time to train your eye. There are no mistakes,
remember you are just training your hands to draw where your eyes see.
After many
blind contour drawings, try a quickly drawn sketch looking at your subject and
your paper. It probably will look free and flowing.
Gesture Drawing
This will help you get feeling into your drawings.

|
If
you are lucky enough to have a model (maybe your dog or cat) then have
lots of paper and charcoal or something easy you like to use to draw
gesture drawings. It's okay to draw everything in stick figure form. You
can use a red crayon or big marker on newspaper. Go outside and draw with
a stick in the sand. If you don't have a model then use your imagination
and have fun. It's the gesture you are after, not the form. What is the
gesture of freedom, of sorrow, etc.?
|
Even buildings and other inanimate objects have gestual feelings.
Take a look in the mirror at your own gestures.
Go to the park and draw people moving about. You only need a glimpse of
them for you to capture their gesture.
Draw people dancing, riding a bike, walking, running, twirling,
bending in different ways, etc.
Modeled Drawing
 |
Use only the side of your chalk, charcoal, conte crayon or pastel.
By varying the pressure of your chalk you can make dark areas and light
areas. You are going to let what you are drawing come out of the dark and
light of your material
If you are
using rough paper, or smooth paper on top of a rough surface, then you may
notice small faces appearing in your drawing. Enhance them, coax them out of the
drawing, again using only the side of your chalk. |
Notice the
light on your subject. Study the value of what you are drawing by squinting your
eyes. You will see the dark and light and medium values more easily. Most
objects appear lightest in the foreground and darkest on the back edges but the
light on your subject can affect the light and dark areas too. Of course,
mountains are darkest up front and lightest as you see the ones in the distance.
Sometimes it's better not to know this but to discover the values as you
draw.
Getting More Depth
If you use an eraser through all of your drawing then redraw it,
your image will have much more depth. Just let your eraser erase through like
your handwriting, leaving some of the drawing and erasing some in a rhythm
indicative of you. Now draw it again.
I know it's
frightening to have a nice drawing and then erase through it, seemingly
destroying it, but a good way you can achieve more depth is to draw several
layers in one drawing and erasing or wiping with a cloth gives grades and marks
you are unable to achieve any other way. You drew it once - so you can draw it
again.

